Saturday, January 26, 2013

lets get organized!! The Home Office pt. 2

 So, here we go with Step 2: Papers, Sorting, and Purging! This will seriously make you feel so much better!

So, this is awful but here is a good portion of the papers I had accumulated. Drawers, bags, even the laundry basket! I camped out on my bed, put a movie on, and got to it.

I didn't get any pictures of the actual sorting but it is very straightforward. I made 3 piles, Toss, Receipts, and Keep. I made a separate pile for the receipts because I am also revamping my whole budget/receipt system. You don't have to make the same piles, just whatever helps you get through your stack.

I want to stop for a moment and give a shout out to one of my favorite most motivating and inspiring blogs, A Bowl Full Of Lemons! I have come across a ton of great resources thanks to Pinterest, but she has seriously helped in getting my rear in gear when it comes to shaping up my home.

Now, who would have guessed the biggest pile was the receipts? I would! It was seriously a mountain! Which brings me to my next project, dealing with the vicious receipt cycle once and for all! And I think I have! Only time will tell, but this method seems awesome and has worked great so far. Click How to Organize Your Receipts to see what I followed. Below is my beautifully finished boxes with all receipts in their proper place. Happy me!


So the paper is finally under control! I had organized my filing cabinet a year ago so thankfully that was ready for all the papers I had to file. I was able to throw out a lot and with my new organizers I made spots for the miscellaneous stuff. So this leads me to Step 3: Putting everything in its place. A.K.A. The finished product!!

Until next time....


Thursday, January 24, 2013

lets get organized!! The Home Office

Hey y'all! So, I took a fairly long break from my little blogging streak, but I'm excited to get back into it! I'm not going to waste anytime either. Are you ready to follow me in 2013, during my year of ORGANIZATION!?! 
Yes, that may sound a BIT intense but wouldn't it be so awesome for everything to have a place and a place for everything?! I was very inspired, by not only the New Year, but also because my family has been sick for the last month and it feels like everything needs to be cleaned, sorted, and well, organized. And no place in our house needed help more than our home office. Since we moved into our adorable little home over 2 years ago I have yet to get our office stuff under control. The computer and filing cabinet have been moved all over (including our bedroom, bleh!). But finally, about 6 months ago, we found the perfect spot. However, that's a far as I got.


I had ideas on being totally organized and on top of things, but I had no plan. And since I had no plan to implement, school papers got stacked all over, receipts had 6 different spots, and bills were buried, and even, forgotten. The pictures do not even tell the whole story. Items that look like they would be helpful in sorting, filing, and organizing, were just jammed with all types of papers just so that they had somewhere to go. I don't even have pictures of the kitchen counter, which also has a cute little organizer that does nothing but hold random things found around the house. The dining room is also a horror show of art supplies and Reese's crazy amount of school papers that I can never seem to throw away. So there I was, January 1, 2013, with a family sick with everything imaginable, while I was waiting on the moment that I could dive right into my first project of 2013, the home office. 

In the midst of still dealing with junky sickness, I had to start. Surprisingly, it wasn't as nearly intense and difficult as I thought. I certainly didn't do it all in one day, but if you break it down in to steps it can be done fairly quickly and efficiently. I used 3 basic steps and will share the first one with you in today's post:
Step 1 Clearing out your space and setting up your layout.
Step 2 Papers, sorting and purging.
Step 3 Putting everything in its place.

Step 1 is by far the most time consuming step but it's also so helpful. You need to be able to see the space you have and make sure it works for you. I didn't take pictures of the cleared out space, sorry! I just got caught up the with excitement of it all and forgot. I love changing rooms around. I always "see" a better set up, so I usually think. I was looking forward to switching around the furniture, assuming that there would be a better, more functional layout. After an hour or more of moving things in every possible way, guess what I found out? The way it was already set up was the most functional setup (minus 2 items plus one wonderful addition). The filing cabinet and the tall, red filing tower found perfect new homes and I also found a way to have a scrapbooking area (YAY!!). What went back into the space was a large red cabinet, a metal cart with 3 shelves, a small side table, my computer desk, and my new craft table that my amazing, talented husband made for me in like an hour. Now that everything was put back, emptied and cleared, it was time to deal with all that was left out, the PAPERS. Which brings us to Step 2 :).
Until next time....

Thursday, May 31, 2012

crockpot BBQ chicken/cookie 'N cream oreo fudge brownies

I never ever ever thought I would be able to make BBQ chicken. Certainly not yummy BBQ chicken sandwiches (one of my favorite foods!!) but…miracles DO happen and I did!! The original recipe wasn't shredded, but we were having friends over and rather than buy more chicken, I shredded it and made sandwiches. And I'm so glad I did too!

I don't have pictures of the chicken but at least you can get the gist of what I did. Did I mention this was super easy?! Changes, as always, are in red.


Ingredients
4-6 pieces boneless/skinless chicken breasts
1 bottle BBQ sauce (18oz) I probably used 17 oz, but I doubt it matters too much
¼ cup vinegar I didn't use quite as much vinegar
1 tsp. red pepper flakes I couldn't find flakes so I got crushed red pepper and used about a 1/2 teaspoon
¼ cup brown sugar
½-1 tsp garlic powder I love garlic, so a full tsp. went in


mix BBQ sauce with all ingredients (minus the chicken)


Place chicken (frozen or thawed, I put it in frozen) in the crock pot. Pour sauce over it. Cook on LOW 4-6 hours. Done :). I took mine out about 4 1/2 hours, shredded it, and put it back in for another half an hour. It turned out great!! Serve on a bun with some french fries on the side and you have an yummy family dinner that feeds plenty :).


I also tried another new recipe last week for Memorial Day....Cookies 'N Cream Oreo Fudge Brownies. Yep, that's what I said. Sadly, I didn't get any good pics of this one either but I will still give you the how-to and then you can make your own ooey-gooey yummy goodness.


Ingredients 
Brownie mix (I used Ghirardelli because it had CHOCOLATE CHIPS in it!)
Eggs and oil (as called for by Brownie mix)
1 heaping 1/2 cup (6oz) of Cookies and Cream ice cream
1/4 cup Hot Fudge topping
Oreos


Preheat oven (according to brownie box) and generously spray 8x8 pan with cooking spray.

 Combine brownie mix, eggs, and oil as directed by box but DO NOT add water.
Add ice cream and hot fudge to batter and stir to combine.


Pour half the brownie batter into the baking dish, layer with Oreos, then top with remaining batter.

Cookies and Cream Oreo Fudge Brownies Recipe

Mmmmm.....it turned out fabulous!!
And it was a good thing I made 2 batches because
there was nothing left when the picnic was over :).

Cookies and Cream Oreo Fudge Brownies Recipe
Until next time....


Thursday, May 10, 2012

Laundry Room redo-Project #1

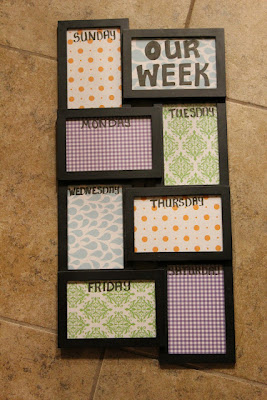
So, who could of bet I would have started organizing my laundry room with a chart project? Well let me tell you, it was sooo super easy and basically free that I had to start with this! Now I have to admit, I got this idea from someone else and like usual, tweaked it to suit my needs. This is how 5ohwifey did it.....


She used it as a weekly to-do schedule. I wanted something to keep track of my laundry mess. Like I said in my last post, I want to complete a load of laundry everyday. Keeping a schedule will help me do that because I love to check things off, maybe some of you are like that too. Oh and making a schedule cute helps even more :)!

This is how mine turned out....

I basically had everything on hand. The frame, the scrapbook paper, and the Modge Podge. I found the letter stickers and glitter on clearance at Michaels. If you wanted to do it the simplest way, you would just use the frame and scrapbook paper. I had extra paper and since I liked it so much, I Modge Podged the frame. The original blogger just wrote the days of the week with a marker on the paper, but I can't STAND my handwriting...LOATHE would be a good way to describe the way I feel about. So I used stickers and glitter which turned out great. Below are pics of the project....

Materials
1-Frame

2-Paper

3-A cute helper :)

I simply cut the paper into 4x6 picture sizes

Then I put the paper in all the frames, ta da!

Some of the "extras" I did was Modge Podging the frame and using double-sided stickers with glitter for the days of the week.

I'm clearly not good at keeping things straight, but it is still a thousand times better than my handwriting.


I also already had a dry-erase marker, score! 
I just wrote down the laundry I wanted done on that day and put the date in the corner. When the load is complete I will wipe off the date and hopefully by Saturday, all the dates will be cleared and ready for next week :). Super, super excited about this!! Until next time.... 


Tuesday, May 8, 2012

a solution to my laundry woes

Now that blogging has motivated me to feed my family, I hope it can motivate me to get my house organized and under some kind of control. We have been in our home for a year and a half now and I still have a room of stuff that we haven't even gone through! I would also like to get a cleaning/chore plan together that will stick with our family. I plan on taking on one room at a time, to avoid any SQUIRRELS, but life could get in the way of that. I love lists, charts, and plans. I love making lists, charts, and plans more than I like keeping to them (I am working on that). I find that I change or update them because I am continually trying to make the daily tasks in my life more simplified (wouldn't we all just love for every job to be done quickly, efficiently, and well?). I especially want to keep my house clean and organized so I always can welcome friends and family over at a moments notice, without feeling stressed.

One task that I can't seem to get a hold of is laundry. Anyone else deal with that? I can't even invite people over during a laundry back up because several loads of clean clothes are piled high all over my living room sofas. With now 6 persons in our family, I demand a schedule that will work for me! I am not a color sorter (ahh!) but I do like to keep nice clothes separated from say, Marc's work clothes. I also always wash in cold and I hardly use the dryer. My make-shift clothes line in the laundry room is hideous, but it works.

This is what typically happens to me. I can throw a load into the wash, but it never makes it to the line/dryer, or if it does make it to the line, it doesn't come down (or if it's in the dryer, it doesn't come out). And if it does get from the line/dryer to my folding table, then it never leaves my table. If it makes it to the table to the correct basket (usually not folded, which is hilarious that I call it a "folding" table) it never makes it out of the room. When it finally gets out of the laundry room, it typically goes onto my actual folding table, the couch. Finally when it's folded and has made it to the right room, it never makes it out of the basket. Ridiculous, but those are my laundry woes.

<><><><>
My folding table
So, the solution (that costs basically nothing)...A new plan, an organized space, and a stronger will power. Well, 2 out of 3 ain't bad. The plan. I do laundry everyday. Just a load. But a complete load. Wash, dry, fold, PUT AWAY. At least then, I stay on top of it. And truthfully, I really like doing laundry. So for me, that isn't daunting. I do laundry by person so I made a list of everyone and gave them a day. I don't want to be doing laundry on the weekend so I grouped Sky and Reese together and Eph and Sawyer together. They share rooms anyways so it's all going to the same place.


Great so, I have a plan! Now, an organized space. First, I would like to show you what I am working with...

FULL Disclosure

My laundry room is also our mud room, but it should just really be called, "the grimiest, dog hairiest place in the house" room. This is where our two 100 pound HAIRY dogs get dried off when it's raining and where the kids get stripped down to their undies when they come in from playing in the barn. If you check out my Laundry board on Pinterest you would find that, unless I get rid of my dogs, children, and clothes, I could have unrealistic dreams as to what a laundry room should look like. But is there anything wrong with wanting a cute, organized, dare-I-say dog hair FREE laundry room?? I say NAY!! Whoa, I felt a severe SQUIRREL coming on...but I'm back.

I will keep you updated as I work on different areas at a time. Hopefully soon, I will have a cute, organzied, dog hair free space. Until next time....

Tuesday, May 1, 2012

french toast bake

Friday's dinner was my third new recipe for the week....French Toast Bake. A perfect breakfast, brunch, or dinner meal. I will totally be making this for Christmas "Eve Eve" this year! It was so easy and absolutely delicious! I found this recipe on Rach's Blog and pretty much followed the directions completely. I also made a couple tweaks that she suggested. Those will be in red :).

This recipe requires up to 10 hours of sitting in the fridge before it can be baked, to allow the bread to soak up all the mix. You will need a 9x13 pan along with the following...

Ingredients
1/2 cup melted butter (1 stick)
1 cup brown sugar
1 loaf Texas toast
4 eggs
1 1/2 cup milk
1 teaspoon vanilla
powdered sugar for sprinkling


Step-by-Step
 - Melt butter in microwave & add brown sugar....stir till mixed.
-Pour butter/sugar mix into bottom of 9 x 13 pan
Spread evenly to cover bottom of pan
-Beat eggs, milk, & vanilla
*I also added 1 tablespoon of powdered sugar during this step

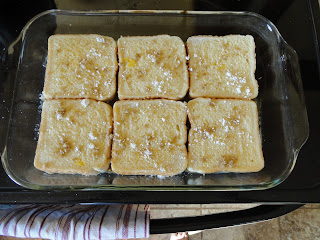
-Lay single layer of Texas Toast on top of butter/sugar mixture in pan
-Spoon 1/2 of egg mixture on bread layer
*I also sprinkled brown sugar and powdered sugar before next layer. I MEANT to sprinkle cinnamon, rather than powdered sugar, but I had a brain fart.

-Add 2nd layer of Texas Toast
-Spoon on remaining egg mixture

-Cover & chill in fridge overnight
*Since we had it for dinner, I made it that morning and refrigerated during the day. I left it for 9 hours just to make sure the bread soaked up all the mixture.


 -Bake at 350 for 45 minutes
I covered it for 20 minutes and left it uncovered the rest of the time.
Sprinkle with powdered sugar
Serve with syrup (if so desired)

The top should be crusty, middle soft and moist, and bottom....
YUM!!!!!!

I ate mine upside down so all the yummy sticky bits didn't get stuck on the plate :).
This was so so good! Next time I will definitely add cinnamon but other than that, this tasted awesome!!

(and yes, that is Banner eating syrup covered French Toast while drinking a Dr. Pepper...yup, he had a great time at Sissy's house)


Thursday, April 26, 2012

meatball sandwich casserole

Alright so, the next new dinner was suppose to be French Toast Bake however, I switched some things around and we will have that on Friday. Tonight's dish, Meatball Sandwich Casserole. Not quite as successful as last night's dinner, but still good. Sadly, this isn't a Skylar friendly food so she had to settle with a hotdog. But I covered it in sauce and mozzarella cheese for her :).

Meatball Sandwich Casserole


I got this recipe from Pearls, Handcuffs, and Happy Hour. There were a couple other recipes on that blog that I also hope to try.
I, like usual, changed something big with the original recipe. You will see it in red. And before people give me a hard time, I WOULD have given in to the onion/pepper mix but I didn't have it and I wanted to make it tonight. Next time I will use it, just to try it the "right" way.
The ingredients...
1 Baguette French Bread, cut into 18-24 slices, 1/4 inch thick {I could not find a Baguette, so I just used a loaf of French Bread. It turned out to be 16 or so slices about 1/4 inch thick}
Olive Oil
1 pkg. frozen Italian meatballs, bite sized, about 1 lb {I used 2 lbs because I used two baking dishes, and 1 lb just didn't seem like enough}
1 pkg. frozen onion & bell pepper mix, thawed & drained {Go ahead and yell. I didn't do this part. But I PROMISE to use it next time!}
1 1/2 cups spaghetti sauce {used Prego Tomato & Basil and I used 2 cups}
1 cup mozzarella cheese, shredded
What I used...


Preheat oven to 350. Meanwhile, slice your bread.


Brush each slice with olive oil on one side. I didn't have a brush so I just used a spoon to "brush" it on. Line the bottom and the side with the bread slices...oil side up...slightly overlapping the slices on the side. You will need a deep casserole dish. The lady I got this from used her 1 qt. Corningware. But because I was using a bigger loaf of bread, I didn't have a lot of room so I used two of my Coringware, a 1 1/2 qt. and a 2 1/2 qt. That's a big reason why I used more meatballs and more sauce too.
Bake bread for about 5-10 minutes or until the edges are golden brown.

In a separate bowl, mix meatballs, (bell pepper & onion mix), & spaghetti sauce to coat.


Remove the bread from the oven and spoon the meatball mixture into the dish on top of the bread. Return to oven and bake for 25-30 minutes or until thoroughly heated through in the center. 
Here's where things didn't go so great for me....25-30 minutes didn't even warm the center. So after probably and hour, the middle was hot (ish) and then I put the cheese on for another 5 -10 min. The recipe never made it clear whether I should have thawed the meatballs first or not. So, next time, I will.
The result....a way too crunchy top and a way too soggy bottom. The middle was good though, and the family still liked it. I was of course bummed, but if I don't try I will never learn, right? Marc probably wonders who this women in the kitchen is and where in the world did Sutton go...but I don't think he is complaining :).

Until next time....